


Great Baby Shower Footprint Invitation Ideas
Baby foot or handprint invitations are a neat idea for a motif on your homemade baby invitations. You can achieve this in a number of different ways. Read through our different ideas and find inspiration to make your own great baby shower invitations.
Make a regular card with a footprint motif
First, create a card by folding some cardstock in half. Remember to make sure that the size of the card will fit the envelopes that you wish to use.
Then you can create a simple design for the front of your card with any of the following.
-
Footprint charms or plaques - you can purchase these from scrapbook and department stores.
-
Footprint buttons. I have found different foot and hand print buttons from craft stores like Michaels, lincraft, Martha Stewart etc.
-
Footprint stamps - Many rubber stamps are available. Buy cheap acrylic stamps and use a cd case to mount it and stamp. This is a great option as inks are available in a myriad of colors.
-
Make your own footprint stamp with your hand. Make a fist with your right hand, dab paint or ink along the side of your hand (along the pinky finger) Stamp an impression of a foot on to card, dab the tip of your pointer finger into the paint and stamp on the five toes. Practice this technique.
-
Buy scrapbooking or craft paper with a footprint design.
Make a footprint shaped card
Make a footprint card template by placing a baby's foot directly on to firm stiff card and draw an outline around the foot. Use the template to make your cards. Cut out your cards and write the shower wording on to it.
Wording for your Baby footprint invitation
The wording can be simple and sweet, you may like to use a tiny toes poem. Ensure you have all the pertinent information. An example is as follows:
You’re invited to a baby shower!
Given in honor of
Janice LandryOn 15 July at 3pm
(Address)
Hosted by Martha and Sarah
RSVP by 10 July to 123.456.7891
Baby Registry: Babies 'R' Us
More baby shower wording ideas and baby invitation poems here
Embossed Baby Shower Footprint Invitation Tutorial
This baby shower invitation card was made with some rub-ons and a footprint stamp that I purchased on Ebay along with a cute little hand print stamp. It was an un-mounted stamp so I got it dirt cheap. I love it when I grab a great bargain.
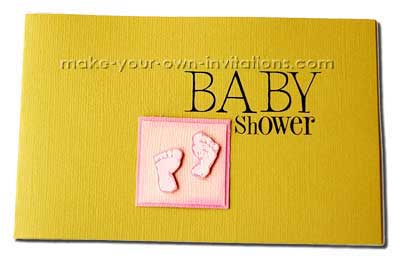
Stamped baby shower footprint invitation
Materials
-
Footprint stamp cheap off Ebay
-
Clear pigment ink for embossing
-
Bazzil cardstock with a linen texture (green, pink, and light pink)
-
Heidi Swapp scrapbook rubons
-
Craft knife, paper trimmer, sticky dots and double sided tape
How to make the invite
Step 1.
I stamped several impressions with the footprints stamp on to dark pink card and embossed them with a light pink embossing powder for extra kick.
Step 2.
I then cut out each little footprint by hand with a small pair of scissors. This super boring task is best done in front of the tv while watching your favourite show.
Step 3.
The square bit that I stuck the feet to are about 1.5" square. I used some scrap bits of card stock that I had in two shades of pink. Once all the little footsies were cut I adhered them to the squares with pop dots for extra dimension. Then I simply stuck the squares to the card.
Step 4.
I used black rub-ons for the text on the front for the first couple of cards until I found a design that I liked. Then I jumped on my pc and re-created the text on MS Word and printed the rest.
Step 5.
You can't see the inside here but there is a white inlay with the details of the party. I cheated here and used plain old copy paper, but the still turned out great!
- Homemade baby shower invitations
- Wording and verses for baby shower footprint invitations
- Printable baby shower invites