
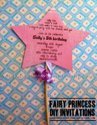
Homemade First Birthday Invitation
 Stacy
shows us how to make homemade Invitations for the first birthday of a little
baby girl Eleni.
Stacy
shows us how to make homemade Invitations for the first birthday of a little
baby girl Eleni.
Products Used:
-
Patterned paper - SEI Scrapbook Papers
-
Bazzil Cardstock, or plain cardstock
-
Ribbon
-
scissors, craftknife, adhesive
Preparation
-
Cut cardstock to fit your envelopes without folding.
-
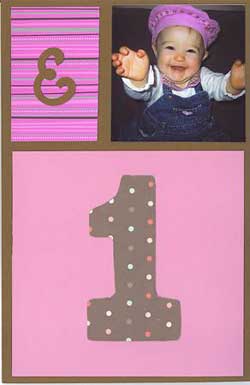
Trying to follow the "rule of thirds" as closely as possible, crop your photo to fit in the top right of the card. Your photo should occupy about 1/3 of the vertical space and 2/3 of the horizontal space. Leaving an equal margin between your pieces of paper, cut one patterned paper to occupy about 1/3 of the vertical and horizontal space for the top left. The bottom piece should occupy about 2/3 of the vertical and almost all the horizontal space.
-
Using a die-cutting machine, or a pair of scissors cut out the first initial of the birthday girl/boy and the number one.
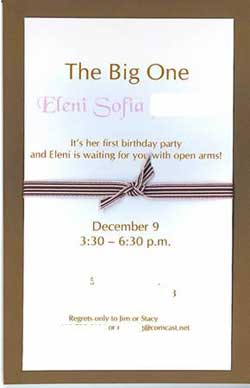
-
Type your invite details in word, to fit within your invite space. I printed mine on white card stock and used a sans-serif font for most of the details and a script font for her name. Be sure to leave room in the middle for the ribbon.
-
Cut two equal lengths of ribbon and tie two of the ends together
Assembling your invitation
I used permanent adhesive for my project and recommend doing the same. For the ribbon, I just used a tape/adhesive runner.
-
You'll want to do the front first. Attach the letter to your smaller block of paper and the number one to your larger block of paper. Adhere the paper blocks and photo.
-
Center your knot and glue down your ribbon on the paper with the invite wording, tucking the ends behind the back. Then adhere the invite wording to the back of the invite.
Homemade by Stacy Perrus
Ellicott City, MD
Home | Contact | Resources | Custom Invitations | Privacy Policy | Blog | Search | YOUR Invitations | Sitemap
© 2015 copyright make-your-own-invitations.com
- More homemade Birthday Invitation ideas
- DIY Birthday Party Invitations
- Share your handmade Invitations