


Powerpoint Save The Date Invitations
These wedding save the dates cards were made by Ruth and they show us another way to save money by making our own photo cards when we don't have access to a handy photo editing program like Photoshop.
Instead we will be using MS PowerPoint to create a save the date card that can be printed on your own printer or at a photo lab super cheap. We will focus on getting the photo right at the time that they are taken to avoid post processing. You may have to dig out the digital camera manual to familiarize yourself with its various functions like convert to black and white.
Made by Ruth Elkin
Dromore, Northern Ireland
What do we need
-
A friend to take your pics
-
A digital camera (hopefully loaded with some extra cool functions)
-
Some white cards or sheets of paper for signs
-
MS Powerpoint
-
Deskjet printer or photolab
-
Cardstock for the backing and extra details
Step 1.
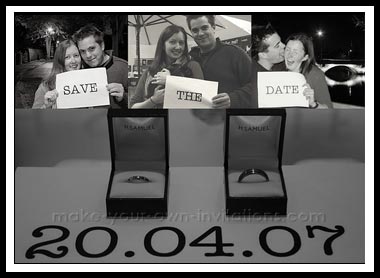
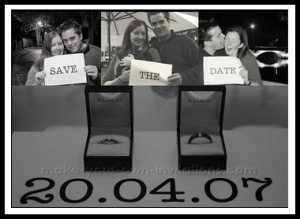
Make up three cards with the words 'save' 'the' and 'date' on them. You can type them on your computer and print them or you can hand write the words your self.
Step 2.
Enlist a friend to take your photos and head off to some of your favourite locations and take pictures of yourself and your fiancé holding up your cards in the different places. Try to vary your poses and make sure to take extra pics so you have a good selection to choose from. If you want black and white or sepia toned photos then change the settings on your digital camera to save yourself doing any post processing when you have uploaded them to you computer.
Step 3.
Upload your photos to your computer and open MS Power Point. Create a new blank presentation. File » New » Blank Presentation then select the Blank content layout and apply it to your new slide.
Insert your photos into the current slide Insert » Picture » From file. Move the photos around until you are happy with the layout. Resize your photos if necessary. You can also use the cropping tool on each separate image to chop out excess background and enhance your photo.
Insert a text box for the date, verses or any other text that you would like to appear on your card. Insert » Text Box.
Step 4.
When your are happy with your save the date invitations then you are ready to print. Print it on your home printer or save it to disk and take your presentation down to your copy shop and print them on to matt photo paper.
Step 5.
Find a nice colored cardstock to print any extra information. Type up your info, print and cut the cardstock to be the same size as your photo. Stick the photo on to the back of the card with glue dots or double sided tape (avoid using liquid adhesives as they may wreck your photos. You can even make the card a quarter inch bigger than the photo so that when you stick them together you will create a small border around the photo.
This tutorial can be applied to any kind of invitations such as birthday or baby shower invites.
Related Links
More Save the date card ideas
Save the date photo cards
Save the date wording samples
Return from Polaroid Save the Date invitations to save the date cards