


Unique Wedding Thank You Cards
- Photoshop Comic Illustration
This tutorial was written for us by Jastone. Read on to find out how he made these fabulous thank you cards...
....
My wife and me came up with the idea for the wedding thank you cards after our wedding. We didn't like the cards you can buy at stores and didn't want to have the, from our point of view, boring one in a million cards with a wedding photo on the front. We wanted to create our own unique thank you cards!
So... what do you do?
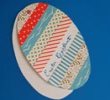
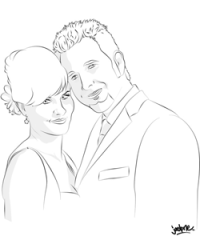
After going through a variety of ideas we ended up with a comic style illustration on the cover of a standard sized postcard with a glossy UV resistant finish.
 What do you need?
-
A computer capable of running software like Adobe Photoshop or GIMP ( http://www.gimp.org/ )
-
An optical mouse or a Wacom pen tablet like i.e. one from the Bamboo collection
-
At least basic experience with the software you're about to use
-
Experience with creating digital images ready to print
-
A picture of you and your loved one (the bigger the better)
-
The measures for the card from your trusted print shop or a blank template file (some printing shops offer blank template files with the right measures, color profile and resolution - just ask them)
Getting Ready
-
I recommend using Adobe Photoshop since this is the tool of my choice and I never really got into the GIMP. The following tutorial is intended for Adobe Photoshop as I can't give you a tutorial for GIMP.
Open the blank template file from your printing shop or open a new file with their specifications. Open the photo you chose and drag'n'drop the image into the new blank file container. Rename this layer with the photo to "original" Resize the layer containing the photo to fit the container. -
If the photo is quite dark you have to lighten it a little so you can see the traced lines better. To do that you have to go to the menu bar a choose:
Image > Adjustments > Brightness/Contrast
and change the brightness up to +65. Don't brighten the photo too much because you still have to be able to see the borders clearly. -
Create a new layer and name it "background". Fill the whole layer with white (press shift+F5 and select 100% white). Then create another layer and name it "lineart".
-
You should now have three layers in order top to bottom "lineart", "background" and "original".
 Draw
the outlines
Draw
the outlines
-
Turn off the visibility for the "background" layer - You'll use the "background" layer every now and then throughout the process to check the lines and the coloring of your drawing against a neutral background. Select the "lineart" layer.
-
Now you have to adjust the shape and behavior of the brush you're going to use. Click on the Paint Brush Tool and then click on the brush palette tab at the right top of your Photoshop screen.
Click on the Brush Tip Shape.
Set the diameter to 6px (you'll have to use different diameters on the image so the result won't look flat - just experiment with the diameter).
Set the angle to -128° and the roundness to 20%.
Hardness and spacing should be set to 100% and 1%.
Go to the Shape Dynamics
set the Size Jitter to 0%,
Control to "Pen pressure",
Minimum Diameter to 27% and leave the other settings blank or at 0%
and the set the Minimum Roundness to 25%.
 And you're done setting the brush.
When you use the brush to stroke a path check the 'simulate pressure'
checkbox.
And you're done setting the brush.
When you use the brush to stroke a path check the 'simulate pressure'
checkbox.
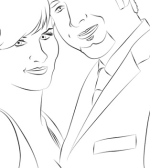
But remember that you should vary the diameter of the brush. You should always use less diameter for the nose and ears than for the main outlines. Make sure the foreground color is black and you're ready to start creating paths. -
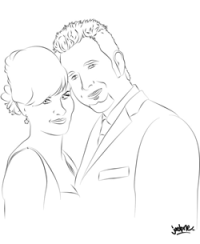
You can either start with the main outlines for face or body or start with the center of focus, which is usually the face.
Click on the pen tool and set it to "create new work path" on the left top of your Photoshop screen.
Create a path paying attention to the angle of the curves. Keep the distance of each line rather short. To get smooth contact points and corners you always create a new layer for a line, let the lines overlap and use the eraser tool to erase the unwanted rest of the line that's standing off. Then just merge the two layers using ctrl+E.
When you're happy with the path you created, right click and select "Stroke Path" and check "Simulate Pressure". If you don't like the path, just use the History Palette to go back.
Don't create a path for every line or wrinkle you see on the image because the lineart image will most likely look way older if you do so. You'll highlight some important characteristics with a light grey later in the process.

 Coloring
-
Once you're done creating the lineart and you're happy with it you can go on to the next step... the coloring.
-
Create a new layer between the "lineart" and "background" layers and name it "color".
Use the Pipette Tool to pick a color from the "original" layer, switch to the Brush Tool and start coloring the "color" layer.
Shading
-
 When
you're done with the basic coloring you'd want to add depth to your drawing.
You have to create another layer between the "lineart" and "color" layers and
call it "shading". For this drawing i used two "shading" layers with
different opacity settings.
When
you're done with the basic coloring you'd want to add depth to your drawing.
You have to create another layer between the "lineart" and "color" layers and
call it "shading". For this drawing i used two "shading" layers with
different opacity settings. -
Set the opacity of the layer to 8% for the lighter shading and to 15% for the darker shading. To not get confused just rename the two shading layers to "shading light" and "shading dark". Make sure the "shading dark" layer is on top off the "shading light" layer.
-
Turn off the visibility for the "color" layer so you can see the "original" layer again. Use the Pen Tool again to create the paths and set the foreground color to black (#000000) or a dark grey (#333333) depending on the intensity for the shading areas.
-
Create closed paths, right click and select Fill Path instead of Stroke Path.
Then you'll want to add some highlights for i.e. the hair. Therefore you have to create a new layer between the bottom "shading" layer and the "color" layer. Pick a color from the "original" layer and create the highlights the same way you created the shadings.
Finishing Off
-
Once you're done and happy with your new lineart drawing you can delete the "original" and "background" layers and merge the other layers.
Select the top "lineart" layer and press ctrl+E untill the layers are all merged. You should now have a single layer with your lineart drawing and a transparent background. -
Create a new layer underneath the layer containing your
lineart and make a nice background. You can use whatever you think matches
your drawing and add some text like "Thank You!" on top of your lineart layer.
I used the free "Yard Sale" font from
http://www.dafont.com with
some added drips for our card.
Save Your Work
-
Don't forget to save your work every now and then, especially after you finished an important step! You don't want to have to create everything again from the beginning because your computer or your software froze or crashed. To export the finished file you should save it as a high resolution JPEG or TIFF (without layers) according to the specifications of your chosen printing shop.
I wish you luck and lots of fun creating your own unique Wedding Thank You Card!
made by jastone
Mannheim, Germany
Related Links
More Unique Wedding Thank You Cards and ideas
How to print your designs with Vistaprint for less than $50
Unique wedding invitation design ideas