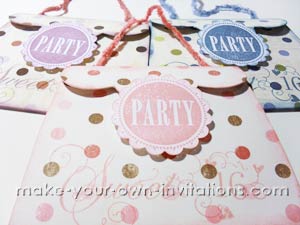


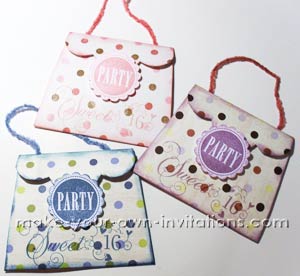
How to make Sweet 16 Invitations
This invitation by Jamie Dennis is mostly made with scrapbooking supplies like a Cricut which you may not have. Check out our other bag invites for a print and cut template.
 Supplies:
- Purse Card Base (OrientalTrading.com)
- Pattern Paper (My Minds Eye)
- White Cardstock
- Circut Cartridge (Mini Monograms: scallop circle)
- Ink (Close to my Heart)
- Stamp Sets (Basic Grey & Close to my Heart)
- Fibers (Close to my Heart)
- Glue Stick
- Foam Tape
- Scissors
- Hole Punch
- Paper Piercer with Mat
- Pencil
- Sponge
Instructions
- Using a glue stick, glue the front of the card base to the left side of a 12x12 pattern paper. It is important to use a glue stick so the paper can stretch a bit and be more flexible when folding into a card.
-
 Cut around the card base and re-fold at score lines.
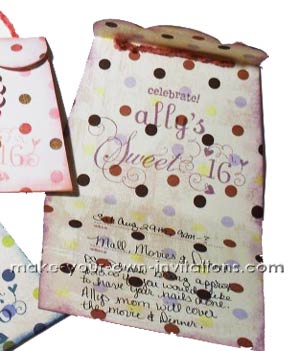
 - Using the left over from the original piece of pattern paper glue to cover the inside of the card.
- Again you will cut around the card base and re-fold at score lines.
- In a coordinating in color, sponge around the edges of the card. This is a great technique to hide any uneven cuts on the card base.
- Using the Mini Monograms Cricut Cartridge, cut a scallop circle from the white cardstock to fit a round stamp that will be used on the front of the card as a closure.
- Stamp the image and sponge the edges.
- Using a paper piercer, pierce a hole into each scallop to add texture.
- Stamp the greeting on the front of the card. I arranged all of the clear stamps on one long acrylic block to make the stamping quicker. The Sweet and swirls are from Basic Grey and the 16 is from Close to my Heart.
- Stamp the inside of the card. I added some more info about the party with a stamp set that had line for the date, location and additional information.
- Punch to holes in the fold line in the top of purse and thread fiber thru for the purse handle.
- Fold up and attach the scallop circle to the front of the card with the foam tape just below the flap so it acts as a closure.