


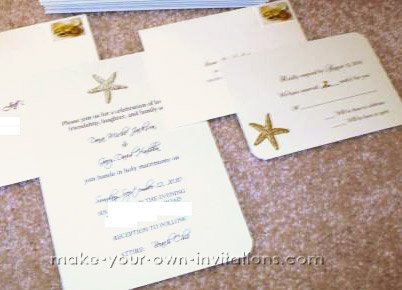
How to make Starfish Wedding Invitations
Dana wanted invitations that were meaningful and that reflected the beach theme of her and her fiancé's wedding, something that incorporated texture, effervescence, and playful elegance. She'd ordered lots of free samples online and although she liked elements of several designs she didn't find anything that really grabbed her. After looking at a you tube video on stamping and embossing, she discovered that this technique was fairly easy for a beginner to do. The starfish stamp incorporated her beach theme and the gold embossing powder incorporated texture and effervescence.
Starfish wedding invitatioins
How to make Starfish Invitations
Since this was beginner embossing project, a simple layout was chosen.
Supplies
-
Starfish stamp
-
Clear pigment ink pad,
-
Glam gold embossing powder from Michaels and A.C. Moore.
-
Cardstock - champagne, gold, and violet stone from Cards and Pockets. They have a variety of colors and styles at a very affordable price.
-
Heat gun
-
Printer, computer, MS PowerPoint program
-
fonts: Scriptina and Poor Richard fonts
Printing your layout first
It is best to print your invitation wording on to your cards before you start the stamping process.
Design you wording layout for the invitations on a Word document or similar. Powerpoint was used for these invitations.
Proof read your wording, get at least one other person to proof read your invitation as well. When you are happy with your layout design and you are sure it is error free then Print your wording on to the card stock.
TIPS - Print on a printer with a rear manual feed tray that allows the paper to enter the printer flat and exit the printer flat without it curving it around as it prints. Ensure your printing settings are correct and match the type of card that you are going to use to avoid paper jams and ink smears.. If you do have trouble then take your invites and print them at a local office supplies store. OfficeMax was eventually used to print these invitations
Stamping and embossing
I’d experimented with various stamps and realized that I would need a stamp with distinct lines, otherwise the embossing powder tends to clump in crevices. I tried stamping in deep violet powder and gold powder. The gold powder is shiny and seemed to sparkle a bit on the paper, so I decided to use the gold powder and to print the wording in a deep purple font.
Step 1 - Spread about 10 invitations out on a table, quickly and carefully stamp the image on all 10 invites with the pigment ink (dye ink cannot be embossed)
Step 2 - Sprinkle the embossing powered over each of the ten stamped images before the ink dries. Shake off the excess powder into a container. The powder will be reused on the remaining invitations.
Step 3 - Use a heat gun to raise the image. You need to be careful to evenly heat the design without burning or warping the paper. Lay them out to dry then you can get started on the next batch.
Made by
Dana Jackson
See Also
More beach starfish invitations
Seashell invitations
Return from Starfish wedding invitations to Make your own wedding invitations